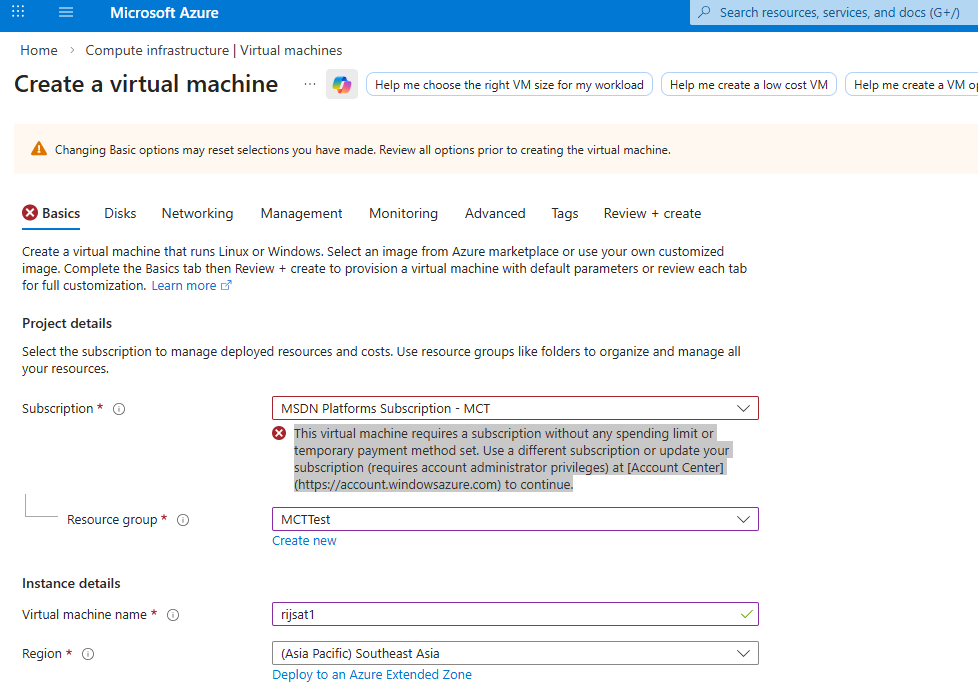
If you’ve tried to deploy a Windows 11 or certain Windows Server images from the Azure portal and got this message:
“This virtual machine requires a subscription without any spending limit or temporary payment method set. Use a different subscription or update your subscription…”
you’re not alone. The warning appears most often on Free Trial, Visual Studio (MSDN), and other credit-based offers that have the Spending Limit turned on by default. When a subscription has a spending limit, Azure proactively blocks some images/flows that could incur charges beyond your credit; in some cases, the portal prevents the deployment outright. [learn.microsoft.com]
Microsoft’s billing documentation confirms how the Spending Limit works (enabled by default for credit-based subscriptions; you can remove it or it re-enables next billing cycle for some offers). If you hit the limit, resources are stopped/deallocated until the limit is removed or the next cycle begins.
In the field, many users report that some newer client images (e.g., Windows 11 23H2/24H2) trigger the spending‑limit gate in the portal, while older releases (e.g., Windows 11 22H2 or Windows Server 2022) may still deploy—or that PowerShell/CLI paths succeed where the portal fails.
Good news: if you can’t or don’t want to remove the spending limit right now, you can often deploy with PowerShell using the Az module—provided you choose a supported image/SKU and keep network resources under control.
What’s going on behind the scenes?
- Spending limit subscriptions block or stop resources to prevent charges beyond your credits; this affects what you can deploy and sometimes which Marketplace images you can pick in the portal. [learn.microsoft.com]
- Community threads show image choice matters—e.g., Windows 11 22H2 or Windows Server 2022 often work where 23H2/24H2 get blocked in the portal. Some users report success via command‑line even with newer images.
- If you can remove the spending limit (account admin + valid payment method), the portal restriction goes away; Microsoft documents exactly how to do this.
Still, we can create the VM with PowerShell
Prerequisites
- Az PowerShell installed and updated (or use Azure Cloud Shell). Microsoft’s tutorial on VM creation via PowerShell is a good refresher of the workflow.
The PowerShell approach (Windows 11 Pro 24H2 example)
The script below:
- Creates/uses RG, VNet, Subnet, NSG, PIP, NIC, then VM.
- Uses
-DomainNameLabelfor the PIP DNS label. - Disables Boot Diagnostics via the modern
Set-AzVMBootDiagnosticcmdlet name (singular). See docs. - Is idempotent: safe to re-run; it only adds missing pieces and avoids duplicate NSG rules.
- Opens RDP (TCP 3389) to the Internet by default—tighten as needed.
PS Script
<#
    Purpose: Provision a Windows 11 VM with VNet, Subnet, NSG (+RDP), Public IP (Standard/Static + DNS label), NIC.
    Notes  :
      - Uses splatting and helper functions for clarity.
      - Idempotent: safe to re-run; it reuses existing resources.
      - Boot Diagnostics disabled (can toggle later if you prefer).
#>

param (
    [string]$ResourceGroup = "MCTTest",
    [string]$VmName        = "rijsat",
    [string]$VnetName      = "rijsat-vnet",
    [string]$SubnetName    = "rijsat-ip",
    [string]$Location      = "southeastasia",
    [string]$AdminUsername = "rijsat",
    [string]$AdminPassword = "AdminXXXX",

    [string]$AddressPrefix = "10.0.0.0/16",
    [string]$SubnetPrefix  = "10.0.0.0/24",

    # Image: Windows 11 Pro 24H2
    [string]$PublisherName = "MicrosoftWindowsDesktop",
    [string]$Offer         = "windows-11",
    [string]$Skus          = "win11-24h2-pro",
    [string]$Version       = "latest",

    [string]$VmSize        = "Standard_D2s_v3"
)

# ------------------------- Configuration & helpers -------------------------
$ErrorActionPreference = 'Stop'
Set-StrictMode -Version Latest

# Derived names
$PublicIpName = "${VmName}PublicIP"
$NsgName      = "${VmName}NSG"
$NicName      = "${VmName}NIC"
$DnsLabel     = $VmName.ToLower()  # must be unique per region; enforced lowercase

# Convert password to PSCredential
$SecurePwd  = ConvertTo-SecureString -String $AdminPassword -AsPlainText -Force
$VmCred     = New-Object System.Management.Automation.PSCredential ($AdminUsername, $SecurePwd)

function Ensure-ResourceGroup {
    param([string]$Name,[string]$Region)
    $rg = Get-AzResourceGroup -Name $Name -ErrorAction SilentlyContinue
    if (-not $rg) {
        New-AzResourceGroup -Name $Name -Location $Region | Out-Null
    }
}

function Ensure-VNetAndSubnet {
    param(
        [string]$Rg,[string]$Region,[string]$Vnet,[string]$VnetCidr,
        [string]$Subnet,[string]$SubnetCidr
    )
    $v = Get-AzVirtualNetwork -ResourceGroupName $Rg -Name $Vnet -ErrorAction SilentlyContinue
    if (-not $v) {
        $subCfg = New-AzVirtualNetworkSubnetConfig -Name $Subnet -AddressPrefix $SubnetCidr
        $vArgs = @{
            ResourceGroupName = $Rg
            Location          = $Region
            Name              = $Vnet
            AddressPrefix     = $VnetCidr
            Subnet            = $subCfg
        }
        $null = New-AzVirtualNetwork @vArgs
    } else {
        if (-not ($v.Subnets | Where-Object Name -eq $Subnet)) {
            Add-AzVirtualNetworkSubnetConfig -VirtualNetwork $v -Name $Subnet -AddressPrefix $SubnetCidr | Out-Null
            $null = Set-AzVirtualNetwork -VirtualNetwork $v
        }
    }
}

function Get-SubnetId {
    param([string]$Rg,[string]$Vnet,[string]$Subnet)
    (Get-AzVirtualNetwork -ResourceGroupName $Rg -Name $Vnet).Subnets |
        Where-Object Name -eq $Subnet | Select-Object -ExpandProperty Id
}

function Ensure-PublicIp {
    param([string]$Rg,[string]$Region,[string]$Name,[string]$DnsLabel)
    $pip = Get-AzPublicIpAddress -Name $Name -ResourceGroupName $Rg -ErrorAction SilentlyContinue
    if (-not $pip) {
        $pipArgs = @{
            ResourceGroupName = $Rg
            Location          = $Region
            Name              = $Name
            AllocationMethod  = 'Static'
            Sku               = 'Standard'
            DomainNameLabel   = $DnsLabel
        }
        return New-AzPublicIpAddress @pipArgs
    }

    # If DNS label is missing, set it
    if (-not $pip.DnsSettings -or -not $pip.DnsSettings.DomainNameLabel) {
        $pip.DnsSettings.DomainNameLabel = $DnsLabel
        $pip = Set-AzPublicIpAddress -PublicIpAddress $pip
    }
    return $pip
}

function Ensure-NsgWithRdp {
    param([string]$Rg,[string]$Region,[string]$Name)
    $n = Get-AzNetworkSecurityGroup -ResourceGroupName $Rg -Name $Name -ErrorAction SilentlyContinue
    if (-not $n) {
        $n = New-AzNetworkSecurityGroup -ResourceGroupName $Rg -Location $Region -Name $Name
    }

    if (-not ($n.SecurityRules | Where-Object Name -eq 'AllowRDP')) {
        $rdp = New-AzNetworkSecurityRuleConfig -Name 'AllowRDP' `
            -Description 'Allow inbound RDP' `
            -Direction Inbound -Protocol Tcp -Access Allow -Priority 1000 `
            -SourceAddressPrefix '*' -SourcePortRange '*' `
            -DestinationAddressPrefix '*' -DestinationPortRange 3389
        $n.SecurityRules.Add($rdp)
        $n = Set-AzNetworkSecurityGroup -NetworkSecurityGroup $n
    }
    return $n
}

function Ensure-Nic {
    param(
        [string]$Rg,[string]$Region,[string]$Name,
        [string]$SubnetId,[string]$PipId,[string]$NsgId
    )
    $nic = Get-AzNetworkInterface -ResourceGroupName $Rg -Name $Name -ErrorAction SilentlyContinue
    if ($nic) { return $nic }

    $nicArgs = @{
        ResourceGroupName     = $Rg
        Location              = $Region
        Name                  = $Name
        SubnetId              = $SubnetId
        PublicIpAddressId     = $PipId
        NetworkSecurityGroupId= $NsgId
    }
    New-AzNetworkInterface @nicArgs
}

# ------------------------- Execution -------------------------
Write-Host "Preparing resource group '$ResourceGroup' in $Location ..."
Ensure-ResourceGroup -Name $ResourceGroup -Region $Location

Write-Host "Ensuring VNet/Subnet '$VnetName/$SubnetName' ..."
Ensure-VNetAndSubnet -Rg $ResourceGroup -Region $Location -Vnet $VnetName -VnetCidr $AddressPrefix -Subnet $SubnetName -SubnetCidr $SubnetPrefix
$SubnetId = Get-SubnetId -Rg $ResourceGroup -Vnet $VnetName -Subnet $SubnetName

Write-Host "Ensuring Public IP '$PublicIpName' (Standard/Static) with DNS label '$DnsLabel' ..."
$PublicIp = Ensure-PublicIp -Rg $ResourceGroup -Region $Location -Name $PublicIpName -DnsLabel $DnsLabel

Write-Host "Ensuring NSG '$NsgName' with single AllowRDP rule ..."
$Nsg = Ensure-NsgWithRdp -Rg $ResourceGroup -Region $Location -Name $NsgName

Write-Host "Ensuring NIC '$NicName' bound to subnet/PIP/NSG ..."
$Nic = Ensure-Nic -Rg $ResourceGroup -Region $Location -Name $NicName -SubnetId $SubnetId -PipId $PublicIp.Id -NsgId $Nsg.Id

Write-Host "Building VM configuration for '$VmName' ..."
$vmPipeline =
    New-AzVMConfig -VMName $VmName -VMSize $VmSize |
    Set-AzVMOperatingSystem -Windows -ComputerName $VmName -Credential $VmCred |
    Set-AzVMSourceImage -PublisherName $PublisherName -Offer $Offer -Skus $Skus -Version $Version |
    Add-AzVMNetworkInterface -Id $Nic.Id |
    Set-AzVMOSDisk -CreateOption FromImage -StorageAccountType "Standard_LRS" |
    Set-AzVMBootDiagnostic -Disable   # singular cmdlet; pipeline-friendly

# Create VM if it doesn't exist already
$existing = Get-AzVM -ResourceGroupName $ResourceGroup -Name $VmName -ErrorAction SilentlyContinue
if ($existing) {
    Write-Host "VM '$VmName' already exists — skipping creation."
} else {
    New-AzVM -ResourceGroupName $ResourceGroup -Location $Location -VM $vmPipeline
}

# ------------------------- Summary -------------------------
$refPip = Get-AzPublicIpAddress -ResourceGroupName $ResourceGroup -Name $PublicIpName -ErrorAction SilentlyContinue
$fqdn = $refPip.DnsSettings.Fqdn
$ip   = $refPip.IpAddress

Write-Host ""
Write-Host "========== DEPLOYMENT SUMMARY =========="
Write-Host "Resource Group : $ResourceGroup"
Write-Host "Location       : $Location"
Write-Host "VM Name        : $VmName"
Write-Host "Image          : $PublisherName/$Offer/$Skus:$Version"
Write-Host "VM Size        : $VmSize"
Write-Host "VNet/Subnet    : $VnetName / $SubnetName"
Write-Host "Public IP      : $PublicIpName ($ip)"
Write-Host "FQDN           : $fqdn"
Write-Host "NSG            : $NsgName"
Write-Host "NIC            : $NicName"
Write-Host "BootDiag       : Disabled"
Write-Host "RDP            : $fqdn:3389"
Write-Host "========================================"
When should you remove the spending limit?
If you’re doing sustained work with paid images, Premium storage, or need to scale beyond the free credits, removing the spending limit is the straightforward fix (and you can enable it again next cycle on some offers). Microsoft’s billing docs explain the options and implications in detail.
Following the script, I was able to create the azure VM with Win 11 even if the azure portal blocks certain VM images on spending‑limit subscriptions. Even if the Azure portal blocks certain VM images on spending‑limit subscriptions, you can often deploy successfully with PowerShell—especially if you choose compatible image SKUs and follow the documented cmdlet patterns.